September 27, 2013

Dark-Green Leaves Light-Green

Design 4 of 31DC2013 - Green Nails

It's not easy being green...unless you're green nail polish that is. Because that's one of the things I find the best about polish - all colors are fun. Even if they don't look particularly complimentary with your skin tone, one can still be rebellious and wear them anyway. If really worried, those colors can be worn just around the house, like fat-pants and fluffy slippers. LOL. 

Nail polish can be removed, no harm, no foul. And the bad colors are tucked away in the Melmer with all the other colors, so no one sees them if you don't want them to. Unless.....you're a crazy proud polish collector who's joined the bold people posting their adventures in nail painting like me recently, of course. Then...well, you show your love for every color and hope like heck that everyone only focuses on the awesome nails and ignores the skin tone around them. [Please.]


Aren't those flowers gorgeous? OK, so the nails are sorta secondary in this photo, but that's because they weren't the whole story that day. See...my Mom was visiting, and so, we did the whole "pick out the polish, try out design ideas, paint & stamp the nails, and play photography studio" together one morning. By the way, you will know when you have a devoted fan. Not only does that person do all of that with a smile while ignoring your annoying perfectionism (i.e., crankiness); but, she also gets excited about a nail polish color that she doesn't particularly like.

Or, maybe she's really just the unfortunate house-guest who is stuck being the unwitting accomplice to the color-crazed polish psycho and too afraid to say "no, I'm not interested in watching the paint dry". You can decide. But it's my story, so I'm going with the first version.


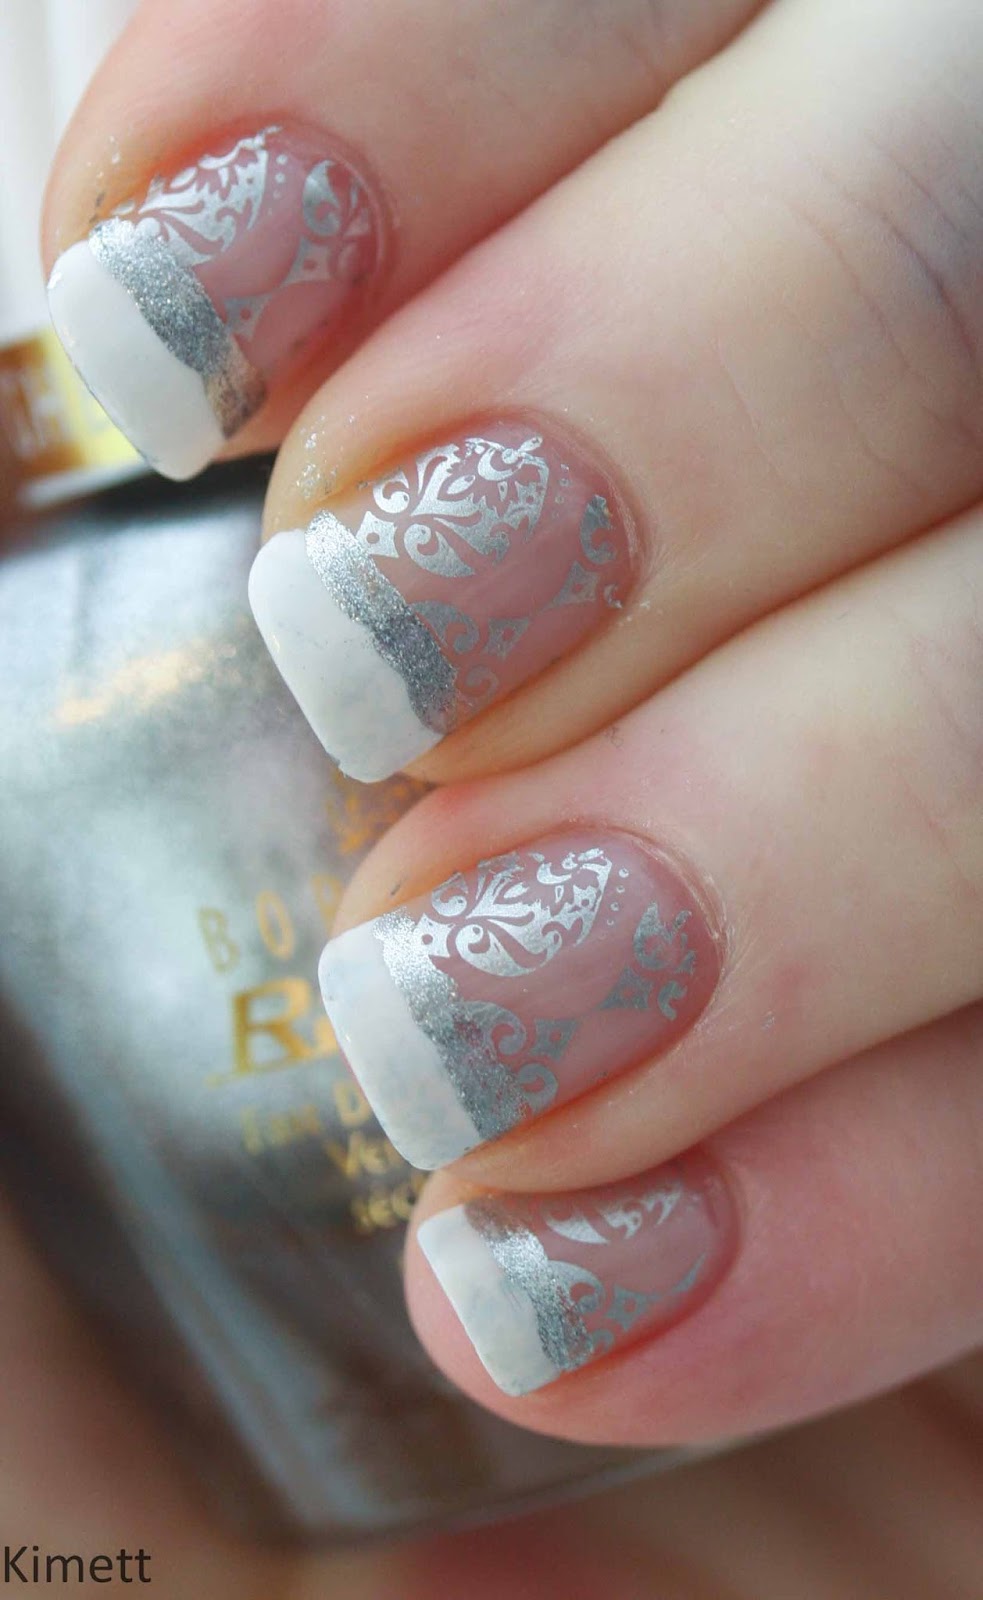
Back to the nails. This was a pretty metallic muted green base with a hunter green cream polish stamped with a delicate leafy print. I'm not sure what the plant is exactly - I've seen it used in terrestrial designs like mine but also as an aquatic plant too. Either way, it's pretty.


I chose to position the stamp so that the bottom was the tip of my nail having the plants grow up to my cuticle. In hindsight, I wish I had done it the other way around. How do I know this? Because I unintentionally placed it this way twice on my right hand and decided it looked better that way.

 Happy accident. Anyway... Mom went out and picked the flower props from our yard (yes, she got to escape for a bit while I top-coated these beauties), which were both appropriate for the design and fun! These pictures don't quite do the nails justice as my photography skills aren't up to the challenge of metallics yet, but we did nail-it on the green design challenge, if I do say so myself. Thanks, Mom. :)

Swatches below:


Materials Used

Rimmel: Rags to Riches (base)
Zoya: Hunter (stamp)
Mash: plate 50

Inspirations

Mom's creative visions of Green

"31 Design Challenge" (see my intro post here)
courtesy of Chalkboard Nails

Till next time,
Kimett
SHARE:

September 25, 2013

A Wink and A Smile

Design 3 of 31DC2013 - Yellow Nails

Yellow is my favorite color on the color wheel. Yet, it is hard to find yellow nail polish with a decent formula, but this polish collector is up to the challenge *smile*wink*. For these nails I picked a bright yellow base polish with a silvery shimmer. Then, giving Mr. Kimett a few choices of colors to use for stamping, he chose black. After which picking the stamp design was a no-brainer.


SHARE:

September 23, 2013

Outerspace Oranges and Peaches

Design 2 of 31DC2013 - Orange Nails


Thinking about the color orange - I thought of Leeloo (short for Leeloominaï Lekatariba Lamina-Tchaï Ekbat De Sebat). She is the "perfect being" in the sci-fi movie The Fifth Element, who along with Bruce Willis' character saves planet earth; and, she has the most awesome orange hair. Despite the indie polish maker Lilacquer isn't currently making polish, I was able to get my hands on most of the collection inspired by this movie. There is a great review of the polish collection here.


SHARE:

September 16, 2013

Dorothy's Ruby Red Slippers


Design 1 of 31DC2013 - Red Nails
Even though these nails don't represent a complicated or time consuming design, they were still a success. It's not always easy to find the right combination of polishes to layer so that they look good and don't detract from the beauty of the individual polishes as well. But, if I don't say so myself, these two colors together were capable of transporting someone to another place...oh, maybe say from Kansas to Oz. LOL


The top layer sparkle made me think of Dorothy's ruby red slippers. Although I don't remember clicking my heels, I did stare at my fingertips for longer than is socially acceptable.


In the bright light, the pink was stronger but in lower light, the red glowed from below. I should have put a second top coat on so that they didn't have a bumpy appearance, yet in real life they looked pretty smooth. And even though the top layer was full of glitter, they were a prize to remove (pun intended - see polish name below).


And a shot of the swatches of the two colors I used. The red cream is absolutely a dream and I am fond of a brighter tone than a classic red. I was very sad when Borghese stopped making nail polishes as I have been happy with the few I did get and loved their double brush.

Materials Used:
Borghese: Che Bella Red (red cream)
Nubar: Prize (magenta base with scattered holographic glitter)

Inspiration Sources:
Dorothy's ruby red slippers in the Wizard of Oz


"31 Design Challenge" (see my intro post here)


courtesy of Chalkboard Nails


Till next time, Kimett
SHARE:

A guided start using 31DC2013

Rather than spend time pondering what colors & designs to put on my nails as I get going with this journal - I thought I'd look to those with more experience to guide me. While I don't know the complete history of the 31-Day Challenges, I did notice that this year's started up this month - timing IS everything. Now, the challenge is to do 31 nail designs in 31 days...but that's out of my ability. So, I'm choosing to use it as a guide for my first 31 entries [roughly - I may sneak in other things in between]. And, who knows, it may take me 6 months or so to get through it, but that's OK with me. 

So, I'm calling it the "31 Design Challenge". 


Courtesy of Chalkboard Nails
Sarah at Chalkboard Nails organized the challenge and for more information, please check it out HERE

Till next time,
Kimett
SHARE:

September 9, 2013

Gumballs, Plus 2

One more practice post with some nails done previously this year.


These nails were so fun to wear. Even Mr. Kimett approved and he quickly named them, "Gumball Nails". There was something about these because two other guys, yes - guys, commented on them; and, no joke, also called them gumballs - huh! Anyway, I combined some new-to-me techniques into one look that was supposed to be my July 4th nails, but the colors I chose didn't stay true red & blue with this technique.
Materials Used
Sally Hansen Xtreme Wear: White Out
Sally Hansen Insta-Dri: Rapid Red
Milani: Botlting Blue
Inspiration Sources
Watercolor nails: too many to choose so here's one by Sarah on Chalkboard Nails
---

 
This was another attempt at a skittlette nails. It shows that I am still learning how to best pick colors/finishes that compliment each other and flow together to make a more cohesive look. (I did this before Marta of Chit Chat Nails put out her informative Skittlette tutorial mentioned in the previous post.) I really liked the tulip stamping design (index & middle).
Materials Used
China Glaze: Aquadelic (index, middle & pinky) and Sweet Hook (thumb & ring)
Sally Hansen Insta-Dri: Pronto Purple (stamping)
Sally Hansen HD: DVD (thumb & ring)
KB Shimmers: Don't Teal Anyone (pinky)
Bundle Monster: plate 306
Inspiration Sources
Skittlette: see above, another Marta tutorial here
 ---

Sorry for the even worse photo, but these nails bring about memories of a recent day when Mr. Kimett and I received great news; hence it gets its place in my journal. I was looking to use a bright and a neutral color together; if I had a longer window of time when doing these I might have pulled it off better, maybe.
Materials Used
Zoya: Cho (thumb, index & pinky) and Kimber (middle & ring)
a-England: She Walks in Beauty (glitter added to each nail)
Inspiration Sources
2 accent nails is a popular design, here's a good one done by Nicole of Nail Polish Wars


Till next time - 
Kimett
SHARE:

September 7, 2013

Never Say Never...

When asked if I was going to start my own blog showing my nail polish adventures, I said, "Nah, I don't want to do that." 

---


It's been about a year since I answered that question and now have changed my mind ... why not? I'm having fun and it's been very therapeutic for me. And, it turns out, I would like to have a record of them and share with those who are interested. I have found from blog-stalking many talented nail-artists/bloggers that it is a fun and welcoming group of people and their enthusiasm is very catching. So here goes nothing.


---

To kick this off (and practice uploading posts), my first entry shows some nails from earlier this year, specifically before I thought I'd be sharing, so please be gentle with me. (Photos are click-able if you dare see them larger.)


One thing I hope to document in this journal is producing photos that are more representative of the fun nails as I experienced them in real life. This seems to be a good photo to use as a starting point, shiny fingers & all, since it doesn't do the nails justice at all. But on to the nails, paisley designs intrigue me and I thought I was clever using a polish with fiery shimmer to poke through behind the stamped design.

Materials Used
Confetti: Masquerade Ball
 China Glaze: Poetic
Bundle Monster: plate BM-315

Inspiration Sources
Stamping GURU: Bregje at Oooh, Shinies!
 ---


Yes, this was for Valentine's Day and it was my first time trying multi-colored stamping (index & middle) as well as mixing base colors in a skittlette fashion. I also remember being proud of using a detail brush with the designs as well.


Materials Used
Confetti: Purple Reigns (thumb & ring)
Sally Hansen Xtreme Wear: White Out (index & middle)
Nicole by OPI: OMB! (pinky)
Sally Hansen Insta-Dri: Pronto Purple & Rapid Red (stamping, index & middle)
Konad: White (stamping & detail)
Mash: plates 28, 38 & 48


Inspiration Sources
 Skittlette creator: Marta of Chit Chat Nails, more info here

---


These were done in honor of my Mom's 25th wedding anniversary with my stepDad. It was fun having a theme - and "giving" with a design. The theme called for a more formal style and I learned a lot of things from trying this out; such as next time to use a detail brush for tips rather than polish brush and to practice with striper brushes before painting on nail.


Materials Used
OPI: Don't Touch My Tutu
Essie: no place like chrome (stamping)
Sally Hansen Xtreme Wear: White Out (tips)
Borghese: Chroma (line)
Pueen: plate 22


Inspiration Sources
 I know there was such an inspiration, I hope to come back and edit the entry.

---


More nails done in honor of someone else - my incredibly talented stepsister, Sarah. She worked really hard for several weeks as a conductor of an orchestra and it was on the concert day that I did these. The idea was to mimic synesthesia (seeing music as color) and the swirling motion of her hands bringing all of the sounds/colors together. While actually going to her critically acclaimed concert would have been a true highlight, I did have fun with these nails - and they had interesting looks depending on lighting and angles.

 Materials Used
Zoya: Zuza, Kimber & Elise
Sinful Colors: Courtney Orange*
Konad: White
Pueen: plate 13


Inspiration Sources
Debbie at The Crumpet: splodging extraordinare, example here

 *Courtney Orange was "the polish that started it all" a couple years ago, explanation worthy of it's own entry. Stay tuned.
---

Till next time, 

Kimett

SHARE:
Blogger Template Created by pipdig